


Before I get started, I just want to announce that I have a new grandchild!!! My second grandson and 3rd grandchild was born this week. We are so excited to have him finally here!! I'm sure I'll be posting pictures and stories in the weeks and months to come!

Now to the post...
Everyone knows that visitors to Hawaii are often greeted with a lei. What you might not know, is that there are many other occasions when leis are not only appropriate, they are almost mandated. We give them on birthdays, graduations, speaking engagements, retirements, promotions, mission farewells, special church meetings, homecomings, departures, after athletic events... you name it - any time someone is singled out, recognized or congratulated for any reason, he or she will be draped with leis by the end of the event. See my daughter and her boyfriend at their graduation a few years ago...

Frequently the leis are made from fresh flowers, but just as often, they will be handmade from other materials, including shells, beads, pearls, paper, candy, even money. Here is one type of lei you can make for your next Hawaiian themed party, birthday, Aloha shirt Friday etc.
To make this lei, you will need:

- one ball of eyelash yarn (I used Lion Brand Fun Fur)
- worsted weight yarn in a matching or contrasting color (you won't need a full skein)
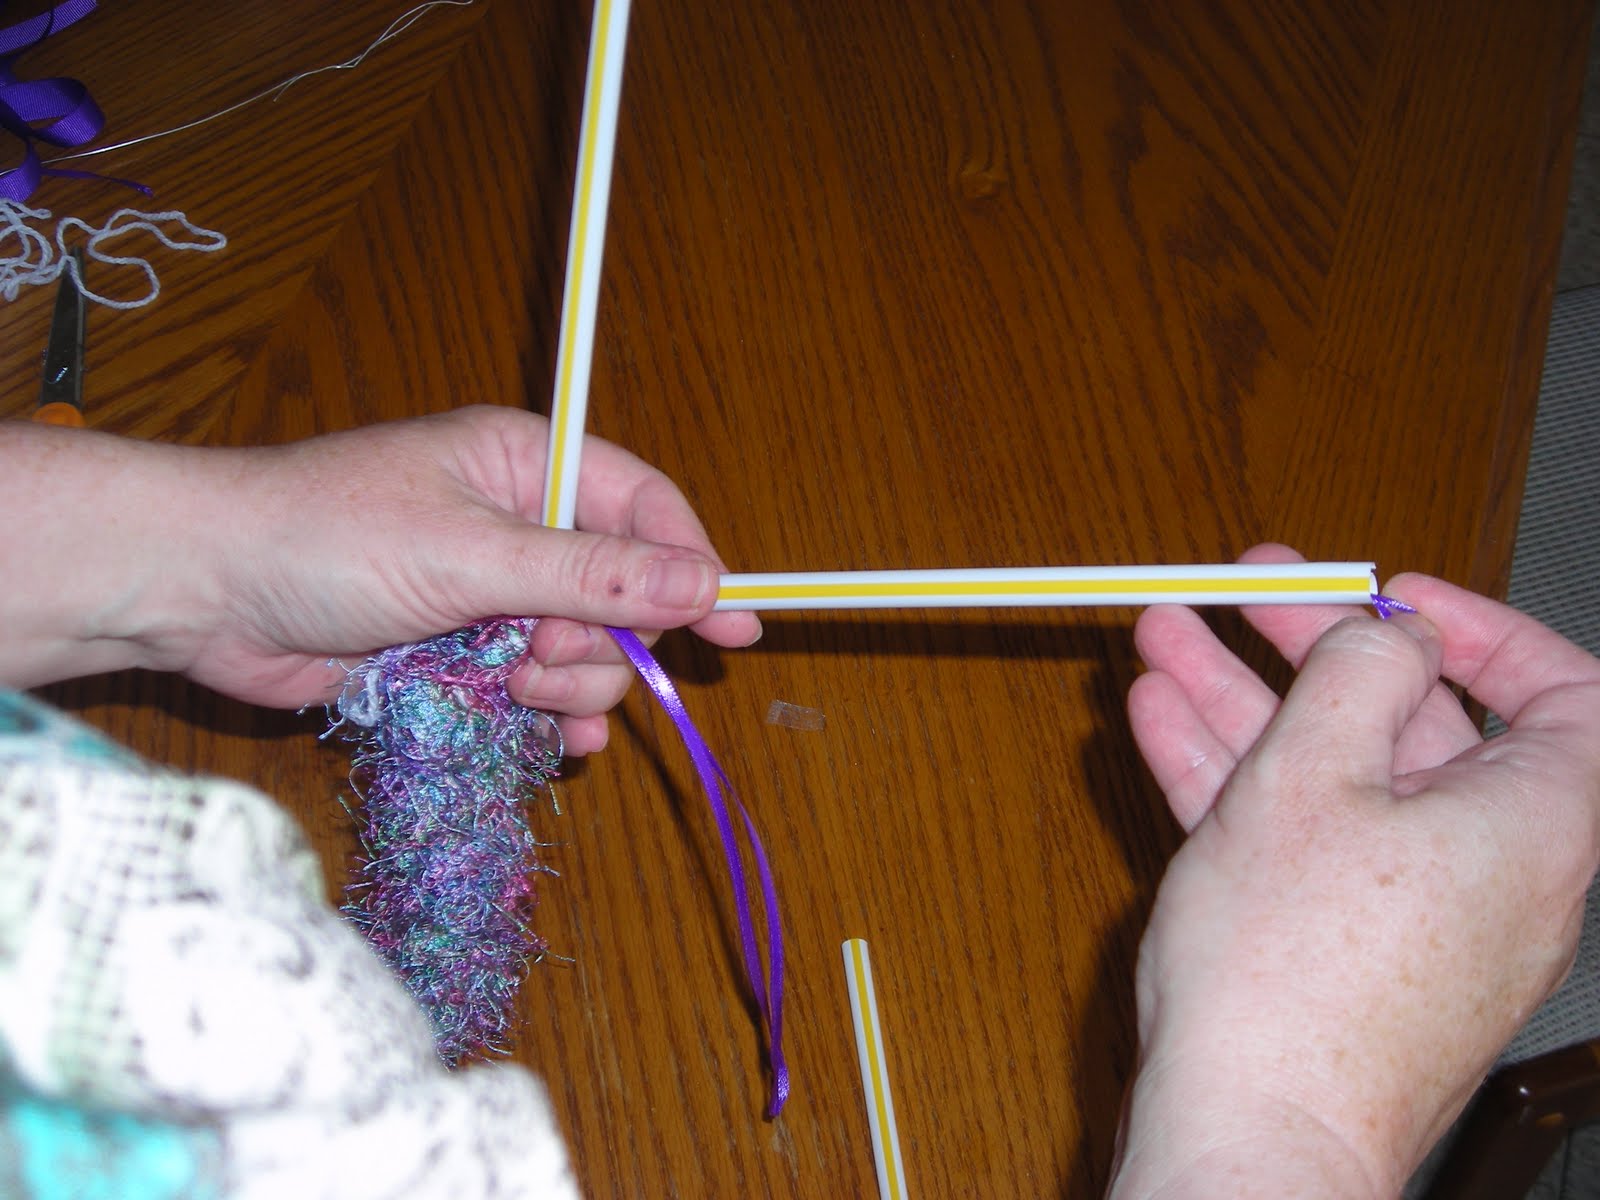
- 3 drinking straws
- 1/8" ribbon in a coordinating color (may substitute worsted weight yarn)
- 3/8" ribbon - you'll need about 12 inches
- 2 kukui nuts or large wooden beads
- craft wire

Then, measure out your ribbon (which will hold your lei together). You want three pieces that are each twice as long as your finished lei will be. Using the craft wire, thread the ribbon through the straws

and secure the end of the loop through the slit in the end of the straw like this:

Attach both types of yarn to one of the straws with a slip knot.


pulling them into a knot like this

Continue wrapping around until the straws are full, then push the whole lot down onto the ribbons. Make sure you leave a little bit on the straw


When your lei is the length you desire (or when all your yarn is used up...) slip the ends of the ribbon off the straws
And sew on a 6 inch piece of 3/8" ribbon for a tie on each end, trimming up the ends of the dangling ribbons. Slip the kukui nut or bead onto the tie and tie a knot to hold it on.

Trim the ends of the ribbon so they won't fray, then tie the ends together and you are done.


Congratulations on your new grandson! He's gorgeous! What a beautiful child. I know you're so excited!! Hope you get lots of time with him...
ReplyDeleteBlessings, Doni
I received one of these a couple years ago and was perplexed on how to make one myself. Thank you for posting it in an understandable format!
ReplyDeleteMahalo!
Congratulations on the new grandbaby! What a joy. Thanks for the tutorial, leis are catching on as a substitute for corsages for lots of occasions now, especially graduations. Thanks for linking up to Finished for Friday!
ReplyDeleteThe lei is beautiful!
ReplyDeleteWhat a fun craft Lorie and a great way to use some of the left over yarn from other projects in a new creative way. Thanks for the great photos explaining the process...
ReplyDeleteTina xo
What a pretty lei. And congratulations on the arrival of your grandson. He is adorable.
ReplyDeleteAloha!
ReplyDeleteLove the lei!
Stopping by from All Thingz Related.
~Makalani
www.MakazHome.com
P.S.
I'm noticing the accent in your posts. Love it! Miss it!
How fun! It's so hard to crochet with this fuzzy yarn, but it's perfect for this! Thanks for linking up to Topsy Turvy Tuesdays! (Precious grandson- congrats!)
ReplyDeleteCongrats on your new (and super duper CUTE) grandbaby!!!
ReplyDeleteI'm having a link party and love it if you would post this. Hubby and I got married in Hawaii and had leis at our wedding, so I'm a bit partial to crafts like this :)
Lamb’s Most Recent Post: Come Link Up! 200th Follower Link Party - You’re Invited!
I spent 3 years living in Hawaii and made a boat load of these when myself, hubby and friends graduated. Thanks for the tutorial and the trip down memory lane!
ReplyDeleteFund idea! congrats on the new grandbaby!
ReplyDeleteHow neat! I love the color of this one!
ReplyDeleteThanks for joining me for Friday Favorites!
I'd love to do this one day. Thanks for the tutorial.
ReplyDeleteCongrats on the grandbaby and thanks for linking to Transform Tuesday. T've never seen leis like this before. Pretty cool!!
ReplyDeletewhat a cutie! fun project...thanks for linking up to "AP Tuesdays!" @ New Nostalgia. Hope to see you again tomorrow!
ReplyDeleteTalofa lava-
ReplyDeleteGreat tutorial! My mom and I made these regularly for special holidays and every graduation season! Fa'afetai lava for sharing the love to others who might want to learn :)
Hi there! I am your newest follower from the blog hop! Lovely blog you have:) You can find me at www.bouffeebambini.blogspot.com
ReplyDeleteYour baby is beautiful! congrats