Tuesday, August 31, 2010

Shroom, Sausage, Spinach and Feta Frittata


I posted a quiche recipe a while back and stated how I am not crazy about the crust. So this is my answer to that problem. This is a single serve recipe, but can easily be doubled and put into an 8-inch skillet so you can share the yumminess with someone special.


1 Sausage Patty
1 sliced green onion
¼ cup sliced mushrooms
¼ cup chopped fresh spinach
Saute this together in the 6 inch cast iron skillet. Remove from heat
Sprinkle
¼ cup crumbled feta cheese on top
Whisk together:
A splash of milk


2 eggs
1 egg white
Pour over mixture in skillet
Place in oven 350 degrees for approx. 10 - 15 minutes or until baked through and gloss isn’t visible on the top.
Remove from oven, sprinkle
1oz. shredded cheddar and Colby over the top,
Return to oven until cheese is melted. Remove and enjoy!
*Because I am sort of dieting, I used turkey sausage patties and grated up a reduced fat cheese stick for the top.
**This is a South Beach Phase 1 breakfast. I am NOT on this diet, but just to note that for those who are diligent enough to make sugar obsolete in their lives – so NOT me!

I have linked to some of these fabulous parties!!

Monday, August 30, 2010

Quilted Rag Baby Bibs

I saw this great tutorial at Creations by Kara a few weeks ago and HAD to make some of these for my girlie!

She shares a tutorial on making frayed edge bibs, and adding an appliqué. I used her technique for tracing an existing bib to make a pattern, and fraying the edges, but I made mine with coordinating fabrics, and pieced them together, and put a frayed edge along the center, edge, whatever of the bib. 

I heart how they turned out!


I also heart how I was able to make these with scraps from other flannel projects! 

(and I hate how my pics turned out... darn cloudy day!)

<3 AmberLou


sharing at some of these parties...

Friday, August 27, 2010

Family Memory Game

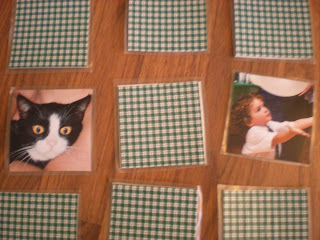
My delightful grandson turned 4 a few months ago. I wanted to do something special for him, but I live oh so far away, and money is kind of tight right now for us. So I made him a game he can play with his mom or aunties or even by himself that maybe he will think of me when he's playing. I called it "Ohana Memory"...

I started by selecting  pictures of family members and having double prints made. This was a little more tricky than it sounds, since I live far enough away from my entire family that I had to go with pictures I already had, rather than just go take new pictures of everyone. I also wanted to make sure that the pictures were all about the same dimensions. I ended up with 15 different pictures for 30 playing pieces.

I decided on a 3" square playing piece. I was able to get some lightweight cardboard (the kind you find on the backs of notepads or spiral notebooks) and cut it into 3" squares. Then I cut the pictures to fit and mounted them on the cardboard. (I'm not going to do a tutorial here... I'm kind of inept at these kinds of crafts, so I'm sure most of you have far better skillz than I do.)


E is a clever little dude, so I didn't want to make the game too easy for him. I made sure to cover the backs of the pieces with a simple, repeating pattern so they'd all look the same. I found a checked scrapbook paper to use.

I finished the game by covering each piece with clear contact paper to protect them and make them last longer.

E thought it was very funny that I included pictures of my cat in his game!!

This was a very fun craft to make and cost me very little... I spent $0.09 for each picture from Costco ($2.70) and about $2 for the scrapbook paper. The rest of the supplies I either had on hand, or got for free.

For an older child, you could use two different pictures of the same person, or a picture and a name to match up to make it more challenging and keep it fun.

Thursday, August 26, 2010

Paint Sample Pumpkins


Here we go again! Its round 4 of the Iron Crafter and this time the secret ingredient was paint samples. I had to get in on it since I'm all about crafting for cheap...how much cheaper can free paint chips get???

I have been in the mood for fall. The weather here in Idaho has been rather cool the past few days and the brisk-ness plus being back on the University campus gave me the idea to get a head start on fall decor sooo, I give you:
The Paint Sample Pumpkins
To make this craft you will need some 4 chip paint samples [the longer the better.]
Ribbon {not pictured}

And some brads. Which might I add a ridiculously hard to find around these parts! So yes, your vision is correct...I bought brads that look like volleyballs! It was the largest I could find and I figured it doesnt really matter since they wont be visible on the finished product.

The next step is pretty simple. Poke the brad through the bottom of the paint samples.
I did 7 chips on the small pumpkin and 11 on the large one.
Open the brad so they dont all fall off!!!
It should look something like this:


Now do the same thing through the tops of the samples and open the brad when all are attached. It make a little ball that resembles a pumpkin. (I will admit I wasnt sure my idea was going to work but, when my 2 year old agreed that I indeed had made a pumpkin I knew I was on the right path. 2 year olds never lie:)

Using some green ribbon I knotted it and cut frays to make it have a stem and then, I too saw a cute lil pumpkin that will sit on my bookcase this fall.

For the larger pumpkin I used brown paint chips to make raffia and knotted and hot glued them to the top of the pumpkin.

I wish my camera was better, this is about the best shot I could get! Crafting possibilities are endless!!!
Enjoy making your own fall decor and go vote for me at fireflies and jellybeans!
-Amanda

Wednesday, August 25, 2010

Tuesday, August 24, 2010

Fun with Canvas

I have an abundance of canvas in my home because my husband {paints} in his spare time. I cannot paint...I am terrible! So I have taken to creating my own artwork with canvas. This is what I came up with......


I made this rather large piece to go above our headboard.


[ I tried playing with the flash...it didnt work too well. My room is NOT this orange:]

I mod podged  paper to the canvas and let it dry and then my husband and I each made a list of 10 reasons why we love eachother and then I printed them up on craft paper and added it to the dry board.


I then just embellished the canvas with ribbon, flowers...


and used my cricut to cut out our names and the word love.


It was a simple and heartfelt way to spruce up our domain. Its nice to look at and remember why we fell in love and why we still are after 4 years together.


The possibilities of making your home heartfelt are endless! 
Have fun using canvas to capture feelings, and memories!!!!
Happy Crafting.
-Amanda

We participate in these link parties.

Monday, August 23, 2010

Extreme Highchair Makeover!

In honor of the show "Extreme Home Makeover" being in my hometown, I give you... EXTREME HIGHCHAIR MAKEOVER!!! 


 When my son was born, I received a hand-me-down high chair from a co-worker. You will only very occasionally catch me saying "no" to {free} stuff, and this high chair was in great shape! Yippee!

Fast forward 4 years... my new baby girl doesn't love the blue boyish theme, and I don't love the additional 4 years of wear put on this high chair by my son, cousins, houseguests, and sitting in storage. 

My solution?

A $4.99 vinyl tablecloth from Ross. 


I'm not {loving} this pic... the cover is a bright orange, but it looks red... grrr!


I put the old cover on top of the tablecloth folded in half, and traced it with a {sharpie}, leaving about an inch gap. Then I cut it out.

I cut out 2 half circle thingies to match the part that originally went over the back


Sewed along the bottom of the circle, right sides together


Then turned it inside out. 

For obvious reasons, you cannot iron vinyl, but I used the weight of my iron {turned off} to "press" the seams on this. It seemed to help. 

Then I made a layer sandwich: 
Body (rightside in), half circle thingy, body (rightside in) and sewed it all together, leaving the bottom open. 

I stuffed the old one inside, (it fit perfectly! the 1" cutting and 1/4" seam allowances were just right to compensate for the padding) 
I sewed up the bottom using a zig-zag stitch, and didn't bother tucking in the edges, since that part doesn't show.


Very last, I zig-zagged around where the safety belt pokes through (I marked it when I was tracing) and cut the hole out. 

I found it helpful to use a long-{ish} stitch, and I made sure to put the side that will be the back facing down, since my machine's teeth was a little rough on the vinyl. (Even though this is pretty heavy duty. My machine must be hungry...)

I am so happy with how it turned out! 


I honestly don't think my baby girl noticed. 

p.s. Drove by the construction site looking for Ty... no luck!

<3 AmberLou


Sharing at some of these parties


1. Do you prefer to write in cursive or print?
A mixed up medley of both...
2. Do you prefer to shop online or go out and actually 
go to the stores?
I love both; shopping is shopping!
3. Would you prefer to go camping or stay in a motel?
Camping! Old School, with a tent!
4. Do your prefer going to the movies or staying 
home to watch one?
With a new baby, prefer isn't really the right question... but we definitely watch more movies at home.
5. Do you prefer a shower or a bath?
Bath... long with bubbles. Been awhile.. :)

NightOwlCrafting

Saturday, August 21, 2010

Rock. Paper. Mod Podge?

You were thinkin scissors weren't you...well folks that's not an option here!
...I mean, it could be if you have super dexterity ablilties but, I sure don't.
That is why I have a Cricut, it handles all the cutting for me!


ANYWAYS...
On to the Rockin' project:]
{So cheesy, I know!}
 My house was in need of some street numbers that were more visible from the road. 
I came up with a simple solution using 'tools' I already had...
Rock.
Paper.
Mod Podge.

I used a large rock that was sitting sadly in the corner of the yard, holding down the weeds that are spreading from next door. {Grr}

I sprayed it down with the hose and then covered that sucker with generous amounts of mod podge. {it was easier than running to the store for some high gloss spray paint.} 
AND... it gave it the same effect...shiny and polished :]


While it was still wet I added the numbers {cut by my cricut} and topped the paper numbers with extra mod podge...those digits are NEVER coming off that rock!

Then I let the not so sad rock dry and gave it a new home in the front yard, in my newly planted flower garden.
{Notice it has rather nice company...I heart my gnome.}


You cant really tell just how polished my rock is but, trust me...its stellar!
Now, no one will ever doubt that I live at 1396...Never, ever:]
Happy Saturday & Happy Crafting!
-Amanda

Please click our link party button to see who we love to link up with!
Visit thecsiproject.com

Friday, August 20, 2010

Delicious Dilly Dip

Like so many folks these days, my hubby and I are cutting back where we can to make ends meet. One of the first and most obvious ways to save a bit of money is by bringing a lunch to work, instead of eating out. But eating the same old thing day after day can be soooo boring. One thing I like to do to keep things interesting is to pack some crunchy veggies with a tangy dip. Here's one I've been making for a while that we really like.
  • 1 cup sour cream
  • 1 cup mayonnaise (I use both light sour cream and light mayo)
  • 1 tsp seasoned salt
  • 2 tsp dried dill weed **
  • 2 tsp dried onion flakes
Mix all the ingredients together and chill. Serve with your favorite raw vegetables, bread dippers or your favorite chips.


** Dried dill can be quite costly in the grocery store. I found it in bulk at a local health food store and it's much cheaper that way. I'm also working on an herb garden and hope to be growing my own soon.


Lorie


sharing at some of these parties