My big boy celebrated his 5th birthday last week, and since making his piñata has sort of become my "thing", a few weeks ago I asked him what kind of piñata he wanted.
A {stegosaurus}.
This is the third year I've made his birthday piñata.
For his fourth birthday (pirate themed) the kiddies busted open a mean shark.

For his third birthday, a cute little red dragon.


So I got busy and made him a stegosaurus.
How to Make a {Piñata}
You will need:
a plan!
balloons
newspaper
flour paste
paint
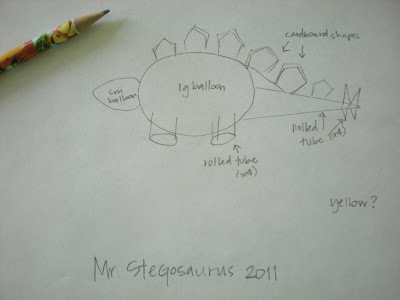
You don't have to draw a map of the pinata, but you should plan out what materials you're going to use to make it the shape you need. You can use pretty much anything that is lightweight.
paint
You don't have to draw a map of the pinata, but you should plan out what materials you're going to use to make it the shape you need. You can use pretty much anything that is lightweight.

This little guy started out as two balloons. The balloons made up the cavity that holds all the candy, and everything else is just for looks.
He is a large balloon and a small balloon

taped together.

Make your flour paste by mixing flour (I started out with 1 cup) and warm water until you have a fairly thick paste. Kind of the consistency of... um... snot.

I don't like working with big long strips of wet sticky newspaper, so I tear mine pretty short - about 6-8" long.

I use a small bowl to hold the piñata as I'm working with it. Since the balloons are round, they'll roll away if you don't have something to support them.

Start by one side of a strip of paper in the paste, and drag it along the edge of the paste bowl to remove the excess.

I like a fairly thick-ish coating

and then stick it on your balloon.

After I covered the large balloon, (leaving a hole to remove the balloons and add the candy),

I made the neck

to connect the two balloons in a non-choppy way, just drape the strips from one to the other, and when you've gone all the way around, add a long strip the other direction.
After I covered both balloons, I set the guy up to dry.

A few hours later, I added a second coat of newspaper to his whole body, and let him dry overnight.
Here he is with two coats, totally dry.

The next morning, I made his tail, legs and spikes.
I made his tail with a couple of sheets of construction paper. I made a tube and then used another sheet to bring the tube to a point.

I stuffed the tube with small balloons (water balloons) to keep it rigid while it dried. I cut small tabs all around the edge of where the tail meets the dino-bum ,

and glued and taped it onto the body.

Next I made the legs. I started with construction paper tubes, then cut a curved chunk out of the side to fit it to the side of Bob's body.

I cut tabs along the curved edge, and taped it on.

Repeat for all four legs. For the hind legs, I kept the outside edge longer, so the legs look more like stegosaurus legs. (Like I've ever seen any...)
I put small balloons in the legs to keep them rigid

then covered them with newspaper

It's starting to look like an animal now!
For the bony plates and spikes, I drew the shape I wanted on some lightweight cardboard (a soda box) and cut them out to attach. I left about a 1" tab along the bottom to use to attach it to the body.

I attached them along the length of the back

Then covered them in newspaper.
After Bob dried completely, I painted him. Some people like to put crepe paper all over, but it is much less work to paint. I put on two coats to cover all the newsprint, and let it dry.

Last, I popped the balloons and removed them, then let the birthday boy fill the cavity up with candy, and patched the hole with a piece of construction paper, which I painted to match.
I rigged up a little harness out of string to hold Bob while the kiddies take turns smacking him. In years past, I've tried building in a wire hanger, but it always falls off... someday I will perfect a way to hold him up without string...


So in all, Bob has two layers of paper over his body, head and tail, and one over his legs. This makes a pretty strong piñata. I let each child have a turn smashing him, (starting with the youngest and going up by age) and blindfold the older kids so they don't kill him with one hit. After everyone has had one or two turns, I open it up to anyone who wants another turn (always the big kids) who crack him open after a few tries.
Every year the kids fight over who gets to take the head home. Kinda morbid.
I'm hoping for his sixth birthday, Mr. E asks for an octopus. Wouldn't that be great!? One balloon and streamers for the legs!
Remember: You can buy a piñata at Wal-Mart, but really - this is more fun! :)
<3 AmberLou