Showing posts with label Amanda. Show all posts

Friday, July 1, 2011

Firecracker Cake!!

I just love this festive holiday cake. Amanda and I made this for a purse party she was hosting with her cousin. It was served with fresh strawberries and was incredibly moist.


I got roped into helping only because Amanda's oven has dual personalities and can't decide if its job is to BAKE or BURN food:) We didn't take a picture of the cake after it had been cut, but the inside is as festive as the outside - red, white and blue!


A tutorial can be found on Betty Crocker's website. It was a hit at the party and the men in our lives were grateful for a couple small slices left over for them!

Have a Great Long Weekend and Happy Baking!
~jan

Linked to our favorite parties listed on the above button and ...
http://www.504main.com/
http://www.designsbygollum.blogspot.com/
http://litandlaundry.blogspot.com/
http://sweet-as-sugar-cookies.blogspot.com/
http://www.homemakerinheels.com/
http://www.bedifferentactnormal.com/2011/07/show-and-tell-saturday-070211.html
http://www.bystephanielynn.com/2011/06/sunday-showcase-party-with-mama-j.html
http://niftythriftythings.blogspot.com/
http://www.itsybitsypaperblog.com/2011/07/red-white-and-blue-linky-party.html


Tuesday, June 28, 2011

Patriotic Wreath

The Fourth of July is my favorite holiday!
I love to decorate for the holiday...indoor and out.


I made a coffee filter wreath for the front door and I am sold!
It was super easy to make and FAST!
 Plus, I think it turned out cute so, all my front door wreaths are going to be made this way from here on out.

To make this wreath you will need:
- 2 pkg.s of coffee filters
- one foam wreath
- hot glue gun/ glue sticks
- paint/ paintbrush
- ribbon to hang 

First, I pulled all the coffee filters apart....


Then, I crumpled up the bottom...


And glued to the wreath, relatively close together.
I wanted it to be extra full.


I did about three "rows" around the wreath, to get the look I wanted.
And then it was mostly finished!
It took about 20 minutes from start to finish...not bad!


Using a paintbrush and selected colors,
I dipped the brush and gently brushed it across the top of the filters.
I did it uniformly to look like a flag but, next time I want to get a little creative and do some funky tie dye...maybe for a summery wreath or a purple and orange and black one for Halloween.

When it was finished drying I added the ribbon and this was the end result.


{yes, I am aware that my door trim needs painted...it on my list to do!}

There are endless possibilities with coffee filters.
I LOVE using them!
You you have done a project using them please leave a comment with you link.
We would love to feature you!

Enjoy your Fourth!

-Amanda


We link to these parties

Tuesday, May 24, 2011

Tickled Tastebuds Tuesday

MMM...popcorn.


OOO....peanut butter!


You'd think I were pregnant, the way I've been craving these two food items.
I have been out of control!!!

No, Im not preggers but, even so...I am totally feeding into my cravings!

I found this recipe that COMBINES my two loves & made one tasty treat.
So, I am sharing my newest addiction with all of you and I hope its tastes as yummy to you as it does to me!


Sweet Peanut Butter Popcorn

Ingredients:

2 (3.5 ounce) packages microwave popcorn, popped

1/2 cup margarine

3/4 cup brown sugar

1/4 cup peanut butter

20 large marshmallows

Directions:

Pour popcorn into a large bowl. In a glass or plastic bowl, combine the margarine, brown sugar, and marshmallows.
Cook at 1 minute intervals in the microwave, stirring between each time, until the mixture is melted and smooth.
Stir in the peanut butter until well blended. Pour the melted mixture over the popcorn, and stir quickly to coat the corn before it cools.
Enjoy!

Tuesday, May 17, 2011

Tickled Tastebuds Tuesday

I have been gluten free for 2 years now!
I am constantly looking for new recipes to try out and this one is awesome!
Of course I forgot to take a photo of my homemade cake so Im borrowing the image from allrecipes.com....which is where I found this delicious cake recipe. 
{Their image is much cuter than any pic I could take anyways!}

Gluten Free Yellow Cake


Ingredients

1 1/2 cups white rice flour

3/4 cup tapioca flour

1 teaspoon salt

1 teaspoon baking soda

3 teaspoons baking powder

1 teaspoon xanthan gum

4 eggs

1 1/4 cups white sugar

2/3 cup mayonnaise

1 cup milk

2 teaspoons gluten-free vanilla extract

Directions

1.Preheat oven to 350 degrees F (175 degrees C). Grease and rice flour two 8 or 9 inch round cake pans.

2.Mix the white rice flour, tapioca flour, salt, baking soda, baking powder and xanthan gum together and set aside.

3.Mix the eggs, sugar, and mayonnaise until fluffy. Add the flour mixture, milk and vanilla and mix well. Spread batter into the prepared pans.

4.Bake at 350 degrees F (175 degrees C) for 25 minutes. Cakes are done when they spring back when lightly touched or when a toothpick inserted near the center comes out clean. Let cool completely then frost, if desired.

-Amanda

Tuesday, May 10, 2011

Tickled Tastebuds Tuesday

I absolutely LOVE all the variations of Chex Mix snacks/treats!
Not being able to eat gluten has no bearing here because the cereal contains no gluten. {except for the wheat chex!} So, I often look to Chex Mix recipes when I need a yummy treat.

Here is one that I thought was especially delicious...and summery.

{Sorry I cant get the image to post.}


Tropical Island Chex Mix

 
8 cups Rice Chex® cereal

1 cup shredded coconut, if desired

1 cup dried banana chips

1 package (7 oz) dried tropical three-fruit mix

1 jar (3 oz) macadamia nuts

3 tablespoons butter or margarine

1/4 cup packed brown sugar

1/4 cup frozen (thawed) pineapple or orange juice concentrate


1) In large microwavable bowl, mix cereal, coconut, banana chips, tropical three-fruit mix and nuts.

2) In microwavable measuring cup, microwave butter uncovered on High about 30 seconds or until melted.
Stir in brown sugar and pineapple juice concentrate.
Microwave uncovered on High about 30 seconds or until hot.
Stir; pour over cereal mixture, stirring until evenly coated.

3) Microwave uncovered on High 6 to 8 minutes, stirring every 2 minutes, until mixture just begins to brown. Spread on waxed paper or foil; cool about 15 minutes.
Store in airtight container.

-Amanda

Tuesday, May 3, 2011

Tickled Tastebuds Tuesday

Mexican food is my FAV!
And even though I have no mexican heritage, I love celebrating Cinco De Mayo with my family by serving up some of our favorite mexican dishes.

I am sooo in love with coconut & pineapple right now, that I have decided to make our delicious:

Virgin Pina Colada's...as our tasty beverage!


Ingredients:

1/2 cup crushed ice

6 fluid ounces pineapple juice
1 fluid ounce coconut cream

1 fluid ounce heavy cream

1 pineapple wedge

1 maraschino cherry

Directions:

In a blender, combine ice, pineapple juice, coconut cream and heavy cream. Blend until smooth. Pour into glass and garnish with pineapple wedge and cherry.

This is a major hit with our family & friends!
Enjoy!
-Amanda


Tuesday, April 26, 2011

Tickled Tastebuds Tuesday

Hope your Easter was family filled and fabulous!
Around this time of year I find myself with a plethora of colored hard boiled eggs.
 Generally, they get turned into egg salad or the tradition deviled egg but, this year I am making this recipe:

Deviled Eggs with an Italian Twist


Ingredients :

12-hard-cooked eggs

4 oz. (1/2 of 8-oz. pkg.) PHILADELPHIA Neufchatel Cheese, softened

3 Tbsp. KRAFT Light Mayo Reduced Fat Mayonnaise

2 tsp. GREY POUPON Dijon Mustard

2 tsp. white vinegar

1 tsp. sugar

1 Tbsp. fresh basil; chopped well.

1 Tbsp. finely chopped sun dried tomatoes {packed in oil}

1 Tbsp. prosciutto; diced

1/8 tsp. paprika


Cut eggs lengthwise in half.
 Remove yolks; place in mixing bowl.
Add all remaining ingredients except paprika; mix well.
Spoon into resealable plastic bag. Cut small corner from bottom of bag; use to pipe filling into egg white halves. Sprinkle with paprika.

Easy as pie! Enjoy your twisted eggs!
-Amanda


Image borrowed from:

Tuesday, April 19, 2011

Tickled Tastebuds Tuesday

Im going through some serious cravings right now. No, Im not pregnant, just cant get enough of Winger's Grill & Bar.


Their Original Amazing Sauce is my favorite. I could slather it on old sneakers, and eat it! {Although, I do suggest eating it slathered on chicken strips}

Since I have already eaten there this week...and still want more...I am making me some:

Copycat Wingers Sticky Fingers!

the recipe is as follows:

2 1/2 C.  brown sugar
3TBS. light corn syrup
1/2 C. hot water
1/3 C. Frank's Red Hot pepper sauce
1 TBS. apple cider vinegar
1 LB. bag of chicken strips {grilled chicken is my preference, the tempura strips are the hubbys}

Directions: In a heavy saucepan, mix brown sugar and corn syrup for 3 minutes; stir continually. Add the other ingredients and boil on low for 15 minutes. Continue stirring during this time, careful so it doesnt burn!
The sauce will thicken as it cools.
While cooling cook {or grill} chicken as directed on package. When finished, remove from oven and while still warm [use tongs] dip chicken strips into the sauce, generously.
Place onto cooking sheet or stone and broil for 5 minutes [just over 2 minutes on each side.]

Serve up with celery sticks and ranch/blue cheese dressing! YUM.

I also love to make a salad using romaine, the chicken pieces, jack cheese, craisins, and tomatoes.
I mix some of the amazing sauce with ranch to give it a lil kick and pour over the top. Mmm its my favorite!

Enjoy!
-Amanda


Thursday, April 14, 2011

Edible Easter Basket


My mom once told me how in her first year of marriage to my father she made him an edible easter basket out of Rice Krispies. My dad, having an insatiable sweet tooth was sure to love it. She then filled it with all the easter goodies giving him 3x the sweetness of the average easter tradition.

I decided to try it for myself....
so technically this isnt my idea but rather,borrowed from my mamacita but,
 Im sure she would love me sharing her genius:)

Instead of making a giant easter basket {using a large mixing bowl as the mold} I made a "my size" individual basket out of a large-ish cereal bowl.
(I say "my size" because my dad would disagree and say the mixing bowl is an individual size treat!)
Feel free to make a large basket, just double the recipe:)

I used the recipe for Rice Krispie treats off the box and added a little extra cereal so it wasn't too sticky to mold in the bowl. I also added some sprinkles for an extra burst of springtime color!


I then sprayed {rather generously} my cereal bowl with cooking spray...as well as my hands!

Taking a handful of the rice krispie mixture, I pressed it into the bowl until I achieved my desired thickness. Repeat this process until the entire bowl is lined.
When finished it looks something like this:


Making the handle was a little tricky. Had I planned on doing this earlier, I would have made sure I had a 'bendy' straw to mold the krispies around. But, I had nothing to use as support for the basket handle so I got inventive.

*side-note: This is where high school pottery class would have come in handy. Too bad I flirted my time away in there! Sorry Mr. Teacher {I cant remember your name.}
If your teen ever complains saying they will never use what they are learning as an adult, this is a prime example of how wrong they are. Haha!


Anywho, pretending your a child using play dough, 'roll' the krispies into a thick snake. If you get it too thin you will notice it starting to fall apart when bending. In that situation ADD MORE KRISPIE!!!
I used the side of that same cereal bowl to form a "C" shape with my rice krispie snake so it would look like a handle and then threw the "C" into the freezer to harden it up a bit.
After a few minutes take the treat out of the freezer and attach it to your basket, pressing the sides of the handle into the bowl.
I put a small childrens cup inside my basket for additional support. (Never having done this before, I was concerned the handle would cave in. It didn't. So this step is optional!)
This is what my "cup-tastrophe" looked like.


Ok, So it wasnt a catastrophe but, getting that cup out wasn't as easy as I thought it would be! That's why I am totally saying OPTIONAL!
After covering it with a dish towel {I didnt want to krispies to be too hard} and letting it sit over-night. I woke up, pulled out the cup and Wal-lah!!!

We have an edible easter basket baby!!!!
Fill her up with cotton candy as grass and some yummy easter candy.


For more edible easter ideas visit this link.
Hope you enjoy your easter!
-Amanda


Tuesday, April 5, 2011

The Gluten Free Happy Meal

Recently, It was brought to my attention that I have been poisoning my beautiful 3 year old with the very same ingredient that altered my digestion for 23 years...gluten.

I was immediately struck with panic & fear that no one seemed to understand. The general response was "at least you know what your doing" or "so lucky your already gluten free!"
I do not in any way feel lucky! I have been gluten free for 2 years and have learned to cook for myself, an adult.

But, a gluten free child is a WHOLE new ball park. Birthday parties, school treats/lunch, Halloween and the beloved Happy Meal have been snatched from my toddler and it overwhelms me with how to compensate for her genetics.


So I did some searching...and decided I should move to Sweden, or rather move back, since it is where my family is originally from. Yes, it is true....you can walk into any McDonald's {or Burger King} and order your burger on a GLUTEN FREE BUN!!!

 Awesome.

But, since moving isn't really an option, I found a bloggin' mama who has been there, done that and I HAD to share what I WILL be doing for my daughter!

Heidi from Adventures of a Gluten Free Mom loves to confuse the McD's staff by buying all the fixin's for a happy meal...minus all the food. {luckily, I have siblings that work there!} and fills them with her own GF chicken nuggets and french fries.


 Did you know you could go to McDonald's and just buy the toy? People do it all. the. time.

My totally cool Mother posted awhile back a YUMMY chicken nugget recipe that is a MUST inside the chicken nuggets box!

My husband works for the plant that actually makes the french fries that McDonald's serves and can buy them in bulk from his work for a fraction of the price. {Perks of being an employee!} So Miss H gets the real deal at home minus the cross contamination! {although I will say, the french fries at the restaurant have never made me ill, that I'm aware of.}

Throw in a toy and juice box and you have yourself a homemade gluten free happy meal.

It may seem like a bit more work than visiting the drive-through but, its totally worth the smile from your GF child!


-Amanda
We link to these parties.

Tuesday, March 29, 2011

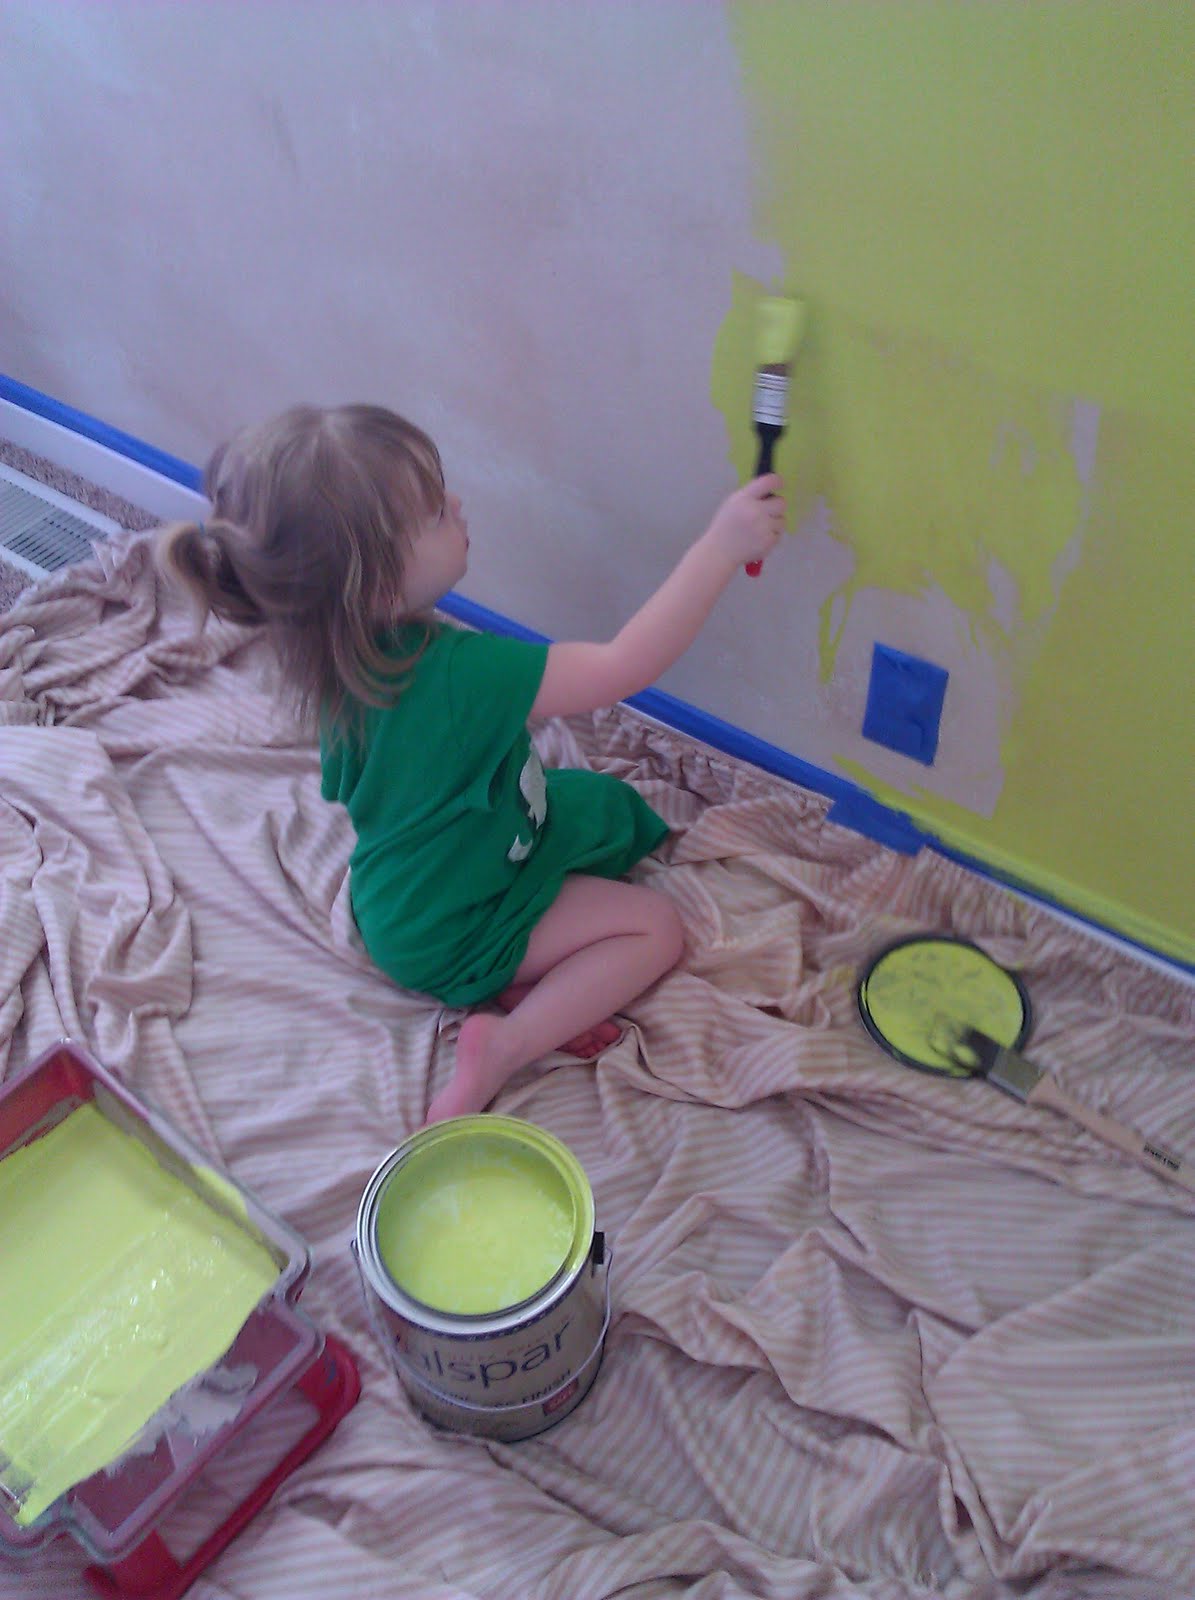
She Loves Green!

Since moving into our home two years ago, I have changed my daughters room three times. Our current color palatte...neon green and turquoise. This is what Miss H's room looked like before...


Here is the during process...


and this is the new room with a few things left to do.


I wasn't too sure how it would turn out but I just went with what the adorable three-year old chose and I must say she has some fun taste. Nice choice baby girl...
Amanda

Tuesday, March 22, 2011

No- Bake Cornflake Cookies


This is one of my favorite recipes!
They are quick and easy to make, and bring back such yummy childhood memories:)
I made these the other day for my husband and daughter and they gobbled them up...I was lucky to get a couple pictures!
My almost 3 year old {on Thursday!}isn't one for sweets but, she LOVED these.
I. was. shocked.

I admit I was kinda hoping there would be more for me but, Im glad I can share my childhood yumminess with the two people I love the most so without further ado:

Momma Jan's Cornflake Cookies

1/2 c. corn syrup
3/4 c. white sugar
1/2 c. peanut butter (both creamy & nutty work)

Combine in saucepan on stove (med. high heat) until all blended and smooth.
Remove from heat and add...

1 c. mini marshmallows

mix until melted into sauce. pour over...

6 c. cornflakes (I have used regular or frosted flakes)

stir all together and scoop by spoonfuls onto wax paper.
Cool...and eat!

So Yummy!!!


-Amanda