Monday, May 30, 2011

The Life and Times of Stegosaurus Bob

My big boy celebrated his 5th birthday last week, and since making his piñata has sort of become my "thing", a few weeks ago I asked him what kind of piñata he wanted. 

A {stegosaurus}.

This is the third year I've made his birthday piñata. 

For his fourth birthday (pirate themed) the kiddies busted open a mean shark.


For his third birthday, a cute little red dragon. 


So I got busy and made him a stegosaurus.

How to Make a {Piñata}

You will need:

a plan!
balloons
newspaper
flour paste
paint


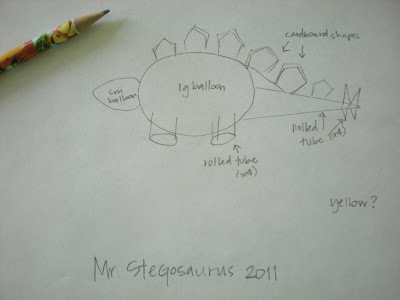
You don't have to draw a map of the pinata, but you should plan out what materials you're going to use to make it the shape you need. You can use pretty much anything that is lightweight.


This little guy started out as two balloons. The balloons made up the cavity that holds all the candy, and everything else is just for looks. 

He is a large balloon and a small balloon


taped together.


Make your flour paste by mixing flour (I started out with 1 cup) and warm water until you have a fairly thick paste. Kind of the consistency of... um... snot.


I don't like working with big long strips of wet sticky newspaper, so I tear mine pretty short - about 6-8" long.


I use a small bowl to hold the piñata as I'm working with it. Since the balloons are round, they'll roll away if you don't have something to support them.


Start by one side of a strip of paper in the paste, and drag it along the edge of the paste bowl to remove the excess. 


I like a fairly thick-ish coating


and then stick it on your balloon. 


After I covered the large balloon, (leaving a hole to remove the balloons and add the candy), 


I made the neck


to connect the two balloons in a non-choppy way, just drape the strips from one to the other, and when you've gone all the way around, add a long strip the other direction.

After I covered both balloons, I set the guy up to dry. 


A few hours later, I added a second coat of newspaper to his whole body, and let him dry overnight. 
Here he is with two coats, totally dry.


The next morning, I made his tail, legs and spikes.  

I made his tail with a couple of sheets of construction paper. I made a tube and then used another sheet to bring the tube to a point.


I stuffed the tube with small balloons (water balloons) to keep it rigid while it dried. I cut small tabs all around the edge of where the tail meets the dino-bum , 


and glued and taped it onto the body.


Next I made the legs. I started with construction paper tubes, then cut a curved chunk out of the side to fit it to the side of Bob's body.


I cut tabs along the curved edge, and taped it on.


Repeat for all four legs. For the hind legs, I kept the outside edge longer, so the legs look more like stegosaurus legs. (Like I've ever seen any...)

I put small balloons in the legs to keep them rigid


then covered them with newspaper


It's starting to look like an animal now!

For the bony plates and spikes, I drew the shape I wanted on some lightweight cardboard (a soda box) and cut them out to attach. I left about a 1" tab along the bottom to use to attach it to the body.


I attached them along the length of the back


Then covered them in newspaper. 

After Bob dried completely, I painted him. Some people like to put crepe paper all over, but it is much less work to paint. I put on two coats to cover all the newsprint, and let it dry.


Last, I popped the balloons and removed them, then let the birthday boy fill the cavity up with candy, and patched the hole with a piece of construction paper, which I painted to match.

I rigged up a little harness out of string to hold Bob while the kiddies take turns smacking him. In years past, I've tried building in a wire hanger, but it always falls off... someday I will perfect a way to hold him up without string...


So in all, Bob has two layers of paper over his body, head and tail, and one over his legs. This makes a pretty strong piñata. I let each child have a turn smashing him, (starting with the youngest and going up by age) and blindfold the older kids so they don't kill him with one hit. After everyone has had one or two turns, I open it up to anyone who wants another turn (always the big kids) who crack him open after a few tries. 

Every year the kids fight over who gets to take the head home. Kinda morbid. 

I'm hoping for his sixth birthday, Mr. E asks for an octopus. Wouldn't that be great!? One balloon and streamers for the legs!

Remember: You can buy a piñata at Wal-Mart, but really - this is more fun! :)

<3 AmberLou


sharing at a few of these parties!

Thursday, May 26, 2011

Stuffie Stuffie Stuffie

Remember THIS post? Miss H made a great gift for her mommy's birthday. Well her creativity didn't stop at just birthdays.

Here is the next installment of a Stuffie gift. Miss H made this for mommy's fabulous Mother's Day!

A flower that never wilts and dies. Who could ask for more?

Our Amanda has one talented girl! (Oma's can be biased - I think it's a law somewhere...)

~jan

Wednesday, May 25, 2011

Wordless Wednesday


I love spring!
~jan

Tuesday, May 24, 2011

Tickled Tastebuds Tuesday

MMM...popcorn.


OOO....peanut butter!


You'd think I were pregnant, the way I've been craving these two food items.
I have been out of control!!!

No, Im not preggers but, even so...I am totally feeding into my cravings!

I found this recipe that COMBINES my two loves & made one tasty treat.
So, I am sharing my newest addiction with all of you and I hope its tastes as yummy to you as it does to me!


Sweet Peanut Butter Popcorn

Ingredients:

2 (3.5 ounce) packages microwave popcorn, popped

1/2 cup margarine

3/4 cup brown sugar

1/4 cup peanut butter

20 large marshmallows

Directions:

Pour popcorn into a large bowl. In a glass or plastic bowl, combine the margarine, brown sugar, and marshmallows.
Cook at 1 minute intervals in the microwave, stirring between each time, until the mixture is melted and smooth.
Stir in the peanut butter until well blended. Pour the melted mixture over the popcorn, and stir quickly to coat the corn before it cools.
Enjoy!

Monday, May 23, 2011

Handmade Favor Bags

My little boy had his 5th birthday party on Saturday (sad!) and I wanted to have a handmade party favor to give to the kiddies.


I decided on personalized drawstring bags for goodies.


I used this {super easy} tutorial, and made 20 goody bags. 


Had to be careful with this picture... I can spell a swear word with all those initials!


I added an initial to each before assembling them, as well as bead{s} to the drawstring.


This was the first time I have used my free-motion foot for appliqué. Holy easy!


I had a really really hard time letting these sweet things leave my house! 


We filled them with candies, squirt guns and bubbles, and Lip Smackers for the girls.


This was a fabulous project for stash busting! And all 20 bags took me about 4 hours total. (That 4 hours includes changing diapers and making lunch:) )


<3 AmberLou

Tuesday, May 17, 2011

Tickled Tastebuds Tuesday

I have been gluten free for 2 years now!
I am constantly looking for new recipes to try out and this one is awesome!
Of course I forgot to take a photo of my homemade cake so Im borrowing the image from allrecipes.com....which is where I found this delicious cake recipe. 
{Their image is much cuter than any pic I could take anyways!}

Gluten Free Yellow Cake


Ingredients

1 1/2 cups white rice flour

3/4 cup tapioca flour

1 teaspoon salt

1 teaspoon baking soda

3 teaspoons baking powder

1 teaspoon xanthan gum

4 eggs

1 1/4 cups white sugar

2/3 cup mayonnaise

1 cup milk

2 teaspoons gluten-free vanilla extract

Directions

1.Preheat oven to 350 degrees F (175 degrees C). Grease and rice flour two 8 or 9 inch round cake pans.

2.Mix the white rice flour, tapioca flour, salt, baking soda, baking powder and xanthan gum together and set aside.

3.Mix the eggs, sugar, and mayonnaise until fluffy. Add the flour mixture, milk and vanilla and mix well. Spread batter into the prepared pans.

4.Bake at 350 degrees F (175 degrees C) for 25 minutes. Cakes are done when they spring back when lightly touched or when a toothpick inserted near the center comes out clean. Let cool completely then frost, if desired.

-Amanda

Tuesday, May 10, 2011

Tickled Tastebuds Tuesday

I absolutely LOVE all the variations of Chex Mix snacks/treats!
Not being able to eat gluten has no bearing here because the cereal contains no gluten. {except for the wheat chex!} So, I often look to Chex Mix recipes when I need a yummy treat.

Here is one that I thought was especially delicious...and summery.

{Sorry I cant get the image to post.}


Tropical Island Chex Mix

 
8 cups Rice Chex® cereal

1 cup shredded coconut, if desired

1 cup dried banana chips

1 package (7 oz) dried tropical three-fruit mix

1 jar (3 oz) macadamia nuts

3 tablespoons butter or margarine

1/4 cup packed brown sugar

1/4 cup frozen (thawed) pineapple or orange juice concentrate


1) In large microwavable bowl, mix cereal, coconut, banana chips, tropical three-fruit mix and nuts.

2) In microwavable measuring cup, microwave butter uncovered on High about 30 seconds or until melted.
Stir in brown sugar and pineapple juice concentrate.
Microwave uncovered on High about 30 seconds or until hot.
Stir; pour over cereal mixture, stirring until evenly coated.

3) Microwave uncovered on High 6 to 8 minutes, stirring every 2 minutes, until mixture just begins to brown. Spread on waxed paper or foil; cool about 15 minutes.
Store in airtight container.

-Amanda

Monday, May 9, 2011

Family Geography


My little boy has been on a map kick lately.  I have no idea how it started. He's been drawing maps from our house to the post office, maps from the kitchen to his bedroom, maps of Tutu's island (Maui), maps of the world, and {oddly} maps of Jerusalem. (?)

I bought a globe awhile ago, and he's very good at finding our state, and Tutu's island, but he's  had a hard time keeping track of where his aunties, uncles, grandpas and cousins live. 

I found this map at Staples. 


Hung it on his wall,

and printed up pictures of all his far-away relations. 


I traced a circle using the bottom of my salt shaker, 


and cut them all out


I glued them to a sheet of yellow cardstock (he picked the color) 


and cut them out so they have a point. (So they point to the city!)


 We stuck them to the map with sticky-tac (so they're movable. My family move a lot.)


I need to get a few more pictures to add to the map... I wish I knew someone on the East coast... that part of this map looks lonely...

This has been a really fun way for my four-year-old to understand geography a {little bit} better. 

<3 AmberLou


sharing at a few of these parties...